How to Repair Water Damaged Masonite Siding
Assessing Water Damage to Masonite Siding
How to repair water damaged masonite siding – Assessing water damage in masonite siding requires a careful examination to determine the extent of the problem and its source. Early detection and proper assessment are crucial for effective repair and preventing further damage to the underlying structure. Ignoring water damage can lead to significant structural issues and costly repairs down the line.
Visual Indicators of Water Damage
Water damage on masonite siding manifests in several ways. Discoloration is a common sign; look for areas that are darker or lighter than the surrounding siding, often appearing as streaks or blotches. These discolorations might be caused by moisture staining or fungal growth.
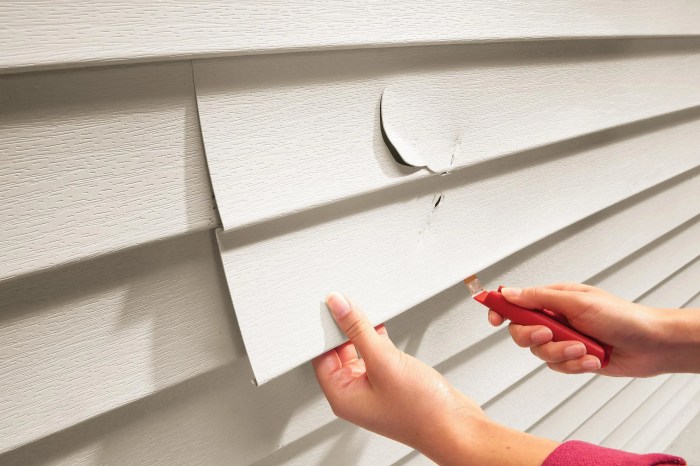
Another visual clue is swelling or warping of the siding panels. Water absorption causes the masonite to expand, leading to bulging or uneven surfaces. Cracking or peeling paint is also a strong indicator of water penetration, as moisture weakens the paint’s adhesion.
Finally, the presence of mold or mildew, often appearing as black, green, or gray spots, signifies prolonged exposure to moisture. These visual cues provide initial insights into the severity and location of the water damage.
Determining the Extent of Water Penetration
Determining the depth of water penetration requires a more thorough investigation beyond visual inspection. Gently probing suspected areas with a screwdriver or similar tool can reveal soft or spongy spots, indicating significant water absorption. If the masonite feels unusually soft or crumbles easily, the damage is likely extensive and may require replacement of the affected panels.
In cases where the damage is less severe, careful examination of the underlying sheathing and framing is necessary to ensure the water hasn’t compromised the structural integrity of the wall. Using a moisture meter can provide a more precise measurement of moisture content within the masonite, assisting in determining the extent of water penetration.
A reading significantly higher than the surrounding area indicates water damage.
Identifying the Source of Water Damage
Pinpointing the source of the water intrusion is crucial for preventing future damage. Inspect gutters and downspouts for proper drainage; clogged gutters can cause water to overflow and saturate the siding. Check caulking around windows and doors for gaps or cracks that allow water to penetrate.
Examine the flashing around chimneys and other roof penetrations for any damage or deterioration. Look for leaks in the roof itself, as water can travel down the exterior walls. Inspect the siding for any holes or gaps that could allow water entry.
A thorough examination of the entire exterior wall system, from roof to foundation, is necessary to identify the source.
Checklist for Assessing Overall Siding Condition
Before beginning any repairs, it is essential to complete a thorough assessment of the masonite siding’s overall condition. This checklist aids in identifying the scope of the project and ensures all areas requiring attention are addressed.
- Inspect all siding panels for discoloration, swelling, warping, cracks, or peeling paint.
- Check for signs of mold or mildew growth.
- Assess the condition of caulking around windows and doors.
- Examine gutters and downspouts for proper drainage and blockage.
- Inspect flashing around chimneys and roof penetrations.
- Check for any leaks in the roof.
- Investigate the condition of the underlying sheathing and framing.
- Use a moisture meter to measure moisture content in suspected areas.
- Document all findings with photographs or detailed notes.
Preparing for Repair
Repairing water-damaged masonite siding requires careful preparation to ensure safety and efficiency. Proper planning minimizes risks and maximizes the chances of a successful repair. This section Artikels the steps involved in safely removing damaged sections, necessary safety precautions, essential tools and materials, and a plan for protecting surrounding areas.
Safe Removal of Damaged Siding
Removing damaged masonite siding necessitates a methodical approach to avoid further damage to the underlying structure or injury to the worker. Begin by assessing the extent of the damage to determine the area requiring removal. Carefully use a pry bar or utility knife to separate the damaged section from the surrounding undamaged siding, working slowly and steadily to avoid cracking or splintering the remaining material.
If nails or screws are present, use a hammer and nail puller or screwdriver to remove them before separating the damaged section. Always support the section being removed to prevent accidental drops.
Safety Precautions for Water-Damaged Masonite
Water-damaged masonite can be fragile and may contain mold or mildew. Therefore, safety precautions are crucial. Always wear appropriate personal protective equipment (PPE), including safety glasses, work gloves, and a respirator mask to protect against inhalation of dust and spores.
If mold is present, consider using a specialized N95 respirator designed for mold remediation. Dispose of removed materials properly according to local regulations; often, this involves double-bagging the waste and labeling it as potentially hazardous. Work in a well-ventilated area to minimize exposure to mold spores.
Essential Tools and Materials
The successful repair of water-damaged masonite siding depends on having the right tools and materials on hand. This includes a pry bar, utility knife, hammer, nail puller or screwdriver, safety glasses, work gloves, a respirator mask, replacement masonite siding (matching the existing siding in color and texture if possible), wood filler, sandpaper, primer, exterior paint (matching the existing paint), caulk, and a putty knife.
Having these readily available will streamline the repair process.
Protecting Surrounding Areas
Protecting the surrounding areas during the repair is essential to prevent accidental damage to undamaged siding, windows, or landscaping. Use drop cloths or plastic sheeting to cover areas adjacent to the repair site. Masking tape can protect window frames and other delicate surfaces from paint splatters.
If working at heights, ensure proper scaffolding or ladder safety measures are in place. For instance, secure the ladder firmly and use a spotter if necessary. This preventative approach minimizes the risk of collateral damage during the repair process.
Repairing Damaged Masonite Siding
Replacing or repairing damaged masonite siding is crucial for maintaining your home’s curb appeal and protecting it from the elements. Proper repair techniques will ensure longevity and prevent further water damage. This section details the process of replacing damaged panels and repairing minor surface imperfections.
Replacing Damaged Masonite Siding Panels
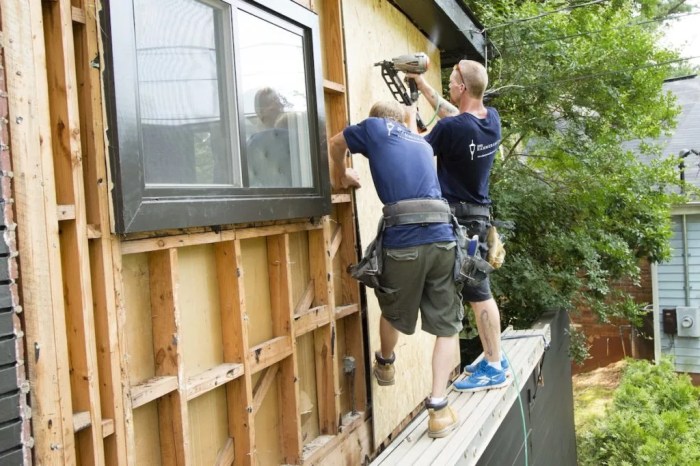
Replacing a damaged masonite siding panel requires careful measurement, cutting, and installation to ensure a seamless fit. Begin by removing the damaged panel, taking note of its dimensions and the method of attachment (nails, screws, or clips). New panels should be purchased from a reputable supplier to match the existing siding.
When cutting the replacement panel, use a sharp utility knife or circular saw with a fine-tooth blade to avoid chipping or cracking. Accurate measurements are critical to ensure a proper fit. Once cut, carefully install the new panel, securing it with the appropriate fasteners.
Ensure the panel is flush with surrounding panels to maintain a uniform appearance.
Repairing Minor Surface Damage
Minor surface damage, such as scratches and dents, can often be repaired without replacing the entire panel. For shallow scratches, lightly sand the area with fine-grit sandpaper, then apply a matching color wood filler. Allow the filler to dry completely before sanding it smooth and repainting the area.
For deeper dents, you may need to use a two-part epoxy filler, following the manufacturer’s instructions for application and drying time. After the filler has cured, sand and repaint as needed to match the surrounding siding.
Sealing and Caulking Repaired Areas
Proper sealing and caulking are essential to prevent future water damage around repaired areas. After replacing or repairing a panel, apply a high-quality exterior-grade caulk to seal any gaps or cracks between the panel and surrounding framing or adjacent panels.
This creates a waterproof barrier that protects the underlying structure from moisture.
Caulking Material Comparison
Several caulking materials are suitable for masonite siding, each with its own advantages and disadvantages. Acrylic latex caulk is a popular choice due to its flexibility, ease of application, and paintability. However, it may not be as durable as other options in extreme weather conditions.
Silicone caulk offers superior water resistance and durability but is less flexible and more difficult to paint. Polysulfide caulk is a highly durable and flexible option but is more expensive and requires specialized application techniques. The best choice depends on the specific application and environmental conditions.
| Step Number | Task Description | Tools Required | Tips/Precautions |
|---|---|---|---|
| 1 | Remove damaged panel, noting its dimensions and attachment method. | Pry bar, screwdriver, hammer | Take photos for reference. Be careful not to damage surrounding panels. |
| 2 | Measure and cut the replacement panel. | Measuring tape, utility knife or circular saw with fine-tooth blade | Use a sharp blade to avoid chipping. Make precise measurements. |
| 3 | Install the new panel, securing it with appropriate fasteners. | Screws, nails, or clips (depending on original installation), hammer or drill | Ensure the panel is flush with surrounding panels. |
| 4 | Fill minor scratches or dents with wood filler or epoxy. | Wood filler or epoxy, putty knife, sandpaper | Allow filler to dry completely before sanding and painting. |
| 5 | Apply exterior-grade caulk to seal gaps and cracks. | Caulk gun, caulk, smoothing tool | Use a paintable caulk if needed. Ensure a smooth, continuous bead. |
| 6 | Paint the repaired area to match the surrounding siding. | Paintbrush, roller, paint | Use high-quality exterior paint. |
Preventing Future Water Damage
Protecting your masonite siding from future water damage involves a multi-pronged approach focusing on enhancing the siding’s inherent water resistance, identifying and addressing vulnerabilities in your home’s exterior, and implementing a proactive maintenance schedule. Regular inspection and timely repairs are key to extending the lifespan of your siding and maintaining your home’s curb appeal.Improving the Water Resistance of Masonite Siding involves several key strategies.
Proper preparation before painting or sealing is crucial for optimal protection. This includes cleaning the surface to remove dirt, mildew, and loose paint, ensuring a smooth, clean surface for the new coating to adhere to. The choice of paint and sealant plays a significant role in long-term water protection.
Exterior Paint and Sealant Selection, How to repair water damaged masonite siding
Choosing the right paint and sealant is vital for preventing future water damage. High-quality, exterior-grade paints specifically formulated for masonite siding offer superior water resistance. Look for paints with a high percentage of acrylic or other water-resistant polymers.
Similarly, a high-quality, elastomeric sealant can effectively seal cracks and gaps, preventing water penetration. These sealants are flexible and can accommodate minor expansion and contraction of the siding due to temperature changes. Always follow the manufacturer’s instructions for application and drying times.
Regular repainting, typically every 5-7 years depending on climate and exposure, maintains this protective layer and extends the life of your siding.
Identifying and Addressing Vulnerable Areas
Several areas on a house are particularly susceptible to water damage. These include areas around windows and doors, where improper caulking or flashing can allow water to penetrate. Similarly, gaps between siding panels, damaged or deteriorated siding, and areas where the siding meets the foundation or roofline are vulnerable points.
Improperly functioning gutters and downspouts can also lead to significant water damage. Standing water near the foundation can also saturate the soil, leading to moisture wicking into the siding. Regular inspection of these areas can prevent minor problems from escalating into costly repairs.
Regular Inspection and Maintenance
Regular inspection of your masonite siding is crucial for early detection of potential problems. At least twice a year, ideally in spring and fall, conduct a thorough visual inspection of your siding. Look for signs of damage such as cracks, peeling paint, loose or missing siding panels, and areas where water may be accumulating.
Promptly address any issues you identify to prevent further damage. This proactive approach can save you significant time and money in the long run.
Gutter and Downspout Maintenance
Properly functioning gutters and downspouts are essential for diverting rainwater away from the foundation and siding. Regular cleaning of gutters and downspouts is necessary to prevent clogs from leaves, debris, and other materials. Clogged gutters can cause water to overflow, leading to water damage to the siding and foundation.
Visualize clean gutters free of debris, with downspouts securely attached and directing water away from the house. Downspouts should extend at least 5-10 feet away from the foundation to prevent water from pooling near the house. Regularly check for any leaks or damage to the gutters and downspouts and repair or replace them as needed.
Advanced Repair Techniques (Optional): How To Repair Water Damaged Masonite Siding
Repairing severely damaged masonite siding requires more advanced techniques than those used for minor repairs. This section details methods for addressing extensive rot, large holes, and significant gaps, employing specialized materials to ensure a durable and aesthetically pleasing outcome.
Remember to always prioritize safety and wear appropriate personal protective equipment (PPE) during these repairs.
Severely damaged or rotted sections of masonite siding necessitate a more aggressive approach than simple patching. The extent of the damage will dictate the best course of action, but often involves complete removal and replacement of the affected area.
This ensures a solid, long-lasting repair and prevents further water damage.
Repairing Large Holes and Gaps
Large holes or gaps in masonite siding often result from impact damage or significant water damage leading to structural failure. Repairing these requires careful preparation and the use of appropriate patching materials. The process generally involves cleaning the area, removing any loose or rotted material, and then applying a suitable filler to create a solid base.
This base can then be shaped and finished to match the surrounding siding. For extremely large gaps, a backing structure may be necessary to provide additional support. Consider using wood or metal supports to create a stable foundation before applying the filler.
After the filler has cured, the patched area can be painted to blend seamlessly with the rest of the siding.
Using Specialized Repair Compounds and Fillers for Masonite
A range of specialized repair compounds and fillers are available for use on masonite siding. These are designed to adhere well to the material, providing a strong and durable repair. Epoxy fillers are a popular choice, offering excellent adhesion and strength.
They are often used for filling larger holes and gaps. Wood fillers, while generally less strong, can be a suitable option for smaller imperfections. When selecting a filler, consider factors such as its strength, flexibility, and ease of application.
Always follow the manufacturer’s instructions for preparation, application, and curing times. Proper surface preparation is crucial for optimal adhesion; cleaning and sanding the area before applying the filler will significantly improve the bond.
Comparing the Effectiveness of Different Repair Methods for Severely Damaged Areas
The effectiveness of different repair methods for severely damaged areas of masonite siding depends on several factors, including the size and extent of the damage, the type of filler used, and the skill of the repairer. For example, using a wood filler to repair a large hole may result in a weak and easily damaged repair.
In contrast, using an epoxy filler or a combination of epoxy and a backing structure will generally provide a much stronger and more durable repair. Replacement of the entire damaged section, while more labor-intensive, often offers the most reliable long-term solution.
Choosing the right repair method involves carefully assessing the damage and selecting the materials and techniques best suited to address the specific problem. In situations involving extensive rot, complete replacement is almost always the most effective and cost-effective solution in the long run, preventing future problems and maintaining the structural integrity of the siding.
Final Thoughts

Repairing water-damaged masonite siding effectively involves a methodical approach combining careful assessment, safe removal of damaged sections, and precise replacement or repair. By implementing preventative measures like regular inspection, proper gutter maintenance, and the application of high-quality sealants, you can significantly extend the lifespan of your siding and maintain your home’s curb appeal.
Remember that addressing water damage promptly is crucial to preventing further deterioration and costly repairs down the line. With the right knowledge and techniques, you can successfully restore your masonite siding to its former glory.
